
 OK, before you start thinking you've discovered an article about bags designed to appeal to the motorized crowd, which we're not opposed to making - after all, Alan and I are both long-time licensed motorcycle operators, but this article pertains to a derivative of the Model 1117 bag we came up with a couple of months ago. However, this bag is designed to fit in a pannier on Steve's bicycle (a pannier is basically a bag with a frame and is attached to the bicycle, usually behind the rider on one or either side of the rear wheel - something like a bike basket). You see, Steve only lives a few blocks from the downtown area and major grocery stores. While he's been seen driving his car around town on rare occasion, he's far more frequently observed riding his bike, I suppose due to the associated health benefits, and because it's good for the environment - it could also be that Steve is even more fiscally conservative than me, but I'm not sure that's possible! On the other hand, maybe that's part of why we get along so well.
Regardless, a few weeks ago we invited Steve to pop over on his bike to see if we could find a problem for our solution - yes, you read that right. We want to make bags. In doing our due diligence market research, we were on a mission to discover a niche market. Steve was willing to talk about his bike-based grocery transportation needs and consequentially we identified a couple of niggly issues. For one, the dimensions of the pannier don't match up well with the average plastic/paper shopping bag the stores provide for customer use. Recyclable/reusable bags don't fare well either. Thus, a difficultly presents itself when attempting to place bags filled with items into the pannier. It's often difficult, it not impossible, to simply drop a bag of groceries into the pannier. More often than not, the shopping bag has to be unpacked in order to load the pannier. The solution here is simple, design a shopping bag that simply slips into the pannier. Which brings us to the point of this article.
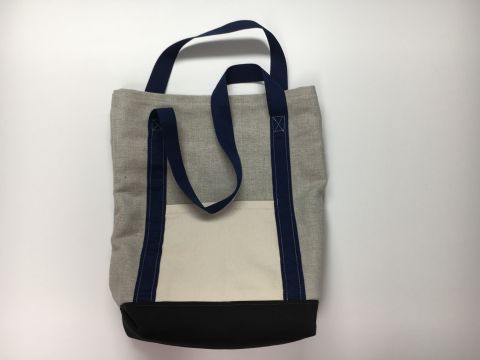
Without specifying actual dimensions - as your needs may vary - Steve's bag needed to be rather tall, of moderate width, and relatively shallow in depth (that is, the distance from the wheel side to the outside, thus minimizing balancing issues for the rider - oh yes, there's science involved here!). After taking measurements of the pannier and Steve's comments regarding his vision of a functional solution, we settled on a derivation of the 1117. In this case, the volume of this bag is roughly 1,400 cubic inches, about twice the volume of a plastic T-shirt bag you can get at the grocery store.
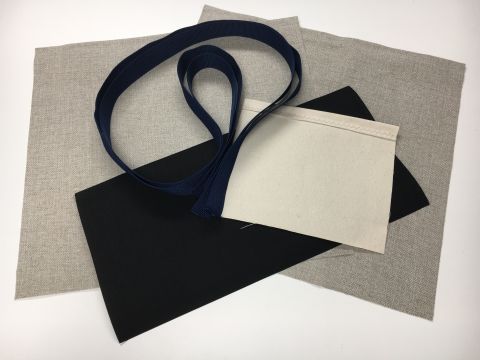 The bag is straight forward to make and with two sewing machines it was a snap. The bag requires two side panels, optional pocket(s), two straps, and a bottom. Tapping into our in-house-artist's ability to identify suitable color combinations from a relatively thin selection of materials on hand, we chose an off-white heavy-weave for the side panels, a cream colored duck cloth for the pocket, blue webbing for the straps/handles, and black Cordura® fabric for the bottom. Cordura is designed to be long-lasting and resistant to abrasions, tears and scuffs, and it's a quick drying and water repellent fabric - in other words, an ideal bottom material.
Granted, there's a bit of math involved in making these bags if the intent is to produce a finished bag at specified dimensions. With that said, the task of cutting materials on a self-healing mat using a rotary cutter is a piece of cake. The top edges of the bag and optional pocket(s) must be turned under (as in making a casing) as one of the first steps. To facilitate this we used 1/4" basting tape to make our lives easier and to very quickly finish this task. To install the pocket on the outside of a side panel, simply center it side-to-side with the bottom matching the bottom edge of the bag's side panel, then cover the edges of the pocket with webbing/strapping and sew in place ensuring there's no twist in the handle.
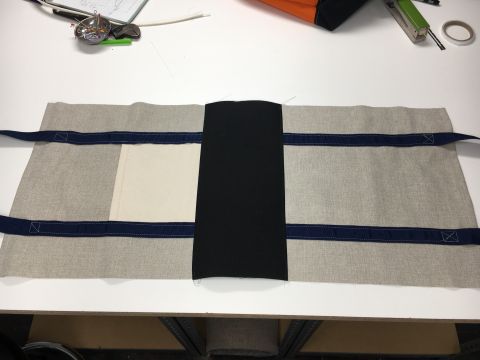 The tricky bit - and yes I know I should be able to see this one coming to avoid mistakes, but still... - is properly attaching the Cordura to the bottom of the side panels so that everything falls into place when the bag is turned inside out (and yes, I'm becoming quite proficient with a seam ripper!) With the bottom sewed on, it's a simple matter of sewing the side panels together. When done correctly the bag looks great! Here's a reference video that shows the entire process.
For our friend Steve, have a great year and enjoy your new grocery-getter bag!