Eastlake Chairs

- Details
- Published: Friday, 19 November 2021 03:12
My "before" chair images are a bit sketchy, as in I'm not sure I actually took any pictures of the set of six that came my way this summer. However, I can show a few pictures of "along-the-way" and "after" images.
John got my contact information from a master craftsman and woodworker Tom, who John had hired to restore the wooden portion of a set of six Victorian era Eastlake dining chairs. It was a genuine delight to work with John and I'm pleased to report he asked if I'd be willing to do a few more chairs for him in the future. He's happy, and I'm thrilled!
 Before I get to the chairs let's get an overview of the Eastlake style. I'm sure you could pop over to Wikipedia and find information on Charles Eastlake and the Eastlake architectural movement in the Victorian era. From Wikipedia, one of the core principles of this style is reported to be, "Eastlake thought furniture should be good looking and be made by manufacturers who enjoyed their work" or perhaps another way of saying this, he expected the craftspeople to take personal pride in their work - something Alan and I are very much appreciate. My takeaway for identifying the Eastlake style is by examining the furniture for carvings formed into the frame of chairs or faces of other furniture, as opposed to carvings glued onto the wood.
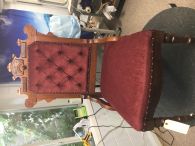
This is a photo of a finished, or nearly finished, Eastlake dining chair. I'll talk about some of the details such as tufting in future articles.
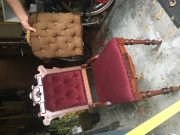
The best I can do for a "before" image is this, a comparison between the before and after inside backs.
Over time, John has accumulated several pieces and after having the wood restored, brought them to me. We decided against restoring with burlap and horsehair, instead opting for post-WWII techniques. As much fun as it could be to work with traditional materials and tools, I have a thing for using air powered staple guns and foam saws! While they didn't exactly match, all six chairs needed to be stripped of old upholstery and new under-seat webbing installed. Which meant the work had to start with a complete tear down then rebuild from scratch. In this case, resetting the coil springs in place after the webbing was installed.
I called my upholster mentor Rollin in for this project for several reasons, but mostly because this was a big one and I didn't want to screw it up by myself! Rollin, remember Rollin? He's my friend who's been doing this kind of work for the past six decades and isn't afraid to tell me to take something apart if it doesn't look right. As I was hand-stitching the springs to the webbing on the first chair, Rollin shook his head and sent me to the supply catalog to buy a Klinch-It tool made for securing coil springs to webbing. I nearly choked upon seeing the price but after I put that tool to work, I figured it would pay for itself after the first couple of jobs!